Advantages of a Concrete Driveway Benefits of a Concrete Driveway in Plano Concrete has been a popular driveway material for many years …

Concrete is a simple material to work with and requires few special tools and equipment. It’s straightforward to pour and lay a cement driveway. Working with concrete is relatively simple on a small scale, but constructing an entire driveway may be difficult. You may build an attractive concrete driveway on your own, but careful planning and preparation are required. To break down a massive driveway into smaller manageable chunks, use a wooden two-by-four plank to separate it into sections.
Install forms on a slope of 2 percent and ensure they’re level and graded for drainage. Design a 2% slope to prevent rain puddles. Every 10 feet will result in a fall of two and a half inches. Install, level, and place a 4 to 6-inch high-quality base material. You will get flooding if you do not have a class 5 base material or gravel in areas with poor drainage. Compact the base using a compactor.
Use a homemade template extending from the top of the forms 4 inches above the finished driveway’s surface to check base thickness. The base is thick enough when it merely touches the gravel at the top. A larger stone will be more durable; we recommend a minimum of 4 to 6-inch driveway thickness. Allow the stone to extend under the forms’ edges.
The base material must be damp. While a friend uses a shovel to push the concrete, begin at one corner of the form and work your way around. Set the form in a level and structurally sound place, then pour the concrete against it and push it into all corners with a square shovel. Push, not drag, the concrete with a hoe. But be careful not to work the concrete too much. If you do, the heavy aggregate will sink to the bottom of the slab and bring up small particles that might cause defects in your DIY concrete driveway. Instead of spacing out your placement to fill the form, put each batch against the last pour.
If you plan to leave the dividers, finish and cure the concrete in sections. Three days after curing, remove the stakes from the inside of the remaining areas and complete them.
Remove a strike from across the form to level it. Do this one batch at a time for big projects. Slowly move the board along the form using a side-to-side sawing motion with two people working together. Even on narrow forms, adding a third person to assist with shoveling concrete speeds up and improves efficiency.
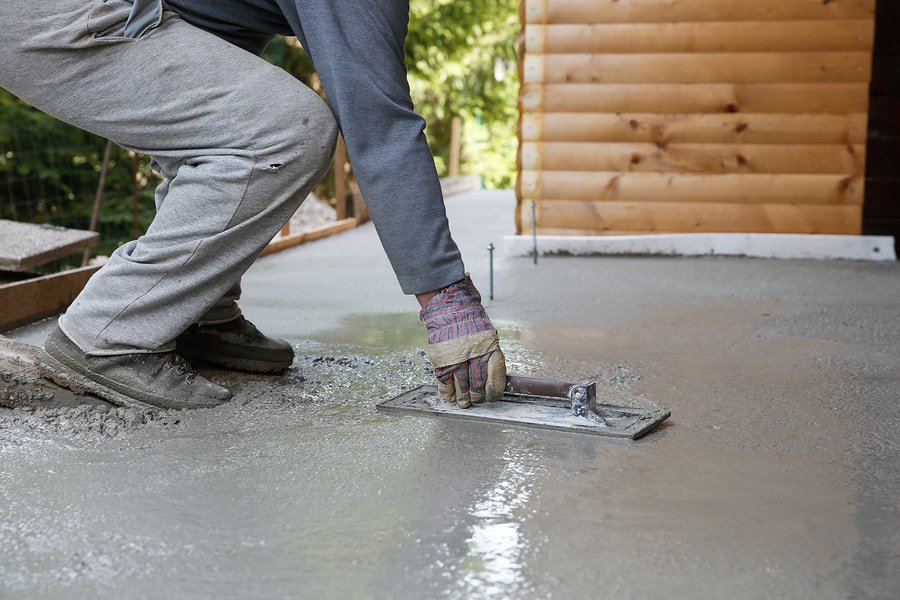
After striking off, you may smooth it out with a bull float or darby float. High aspects and pits left after striking off should be smoothed down.
The darby float is a small hand float that you can use to clean off the dust and debris. For larger DIY concrete projects, utilize the bull float. Push it away from you, then pull it back. You should overlap each stroke.
Giving your concrete driveway or sidewalk a curved edge can help it resist chipping and prevent stub-toes or tripping accidents. To edge the cement:
Large slabs of concrete will crack over time. To help control this, you need to set joints with a 1-inch jointer. This will help create control joints which will help the slab from cracking too much. When doing this, it might be helpful to kneel on a panel so that you can reach the middle of the slab better. Control joints should be about a quarter of the slab’s thickness deep. Having more joints will help to prevent your concrete from cracking. Mark the joints on the forms. Floating can remove any marks from edging or jointing.
After the water, the glossy surface has vanished from the concrete. Before the concrete surface becomes hard, you can use a wooden float or a magnesium hand float. The magnesium hand float will give the surface a smoother feel.
Use a magnesium float to lay air-entrained concrete if the driveway contains a natural stone. A wood float may harm the driveway surface. Hold the tool flat on the surface with both kinds of floats. Reach halfway through a huge slab, get down on your knees, and then finish working backward over the board marks as you go forward once again.
Please don’t use a steel trowel on outdoor surfaces if you don’t plan to broom-finish afterward. A steel trowel creates a very slick surface when wet, which can be dangerous.
Concrete slabs need to be moist so that their surface does not dry out and become fragile. If the surface dries too quickly, it may turn powdery or disintegrate. Cover the concrete with straw and moisten it as needed until completely cured. Keep it moist.
In winter, wait at least three days longer for curing. It’s wise to wait a week to be safe. Do not walk on the slab for at least four days and avoid using a car until ten days have passed.

Advantages of a Concrete Driveway Benefits of a Concrete Driveway in Plano Concrete has been a popular driveway material for many years …
How to Install a Concrete Driveway How to Install a Concrete Driveway An Easy-to-Follow Guide Concrete is a simple material to work …
7 Signs it’s Time for Driveway Renovation Do you know if it is time to replace your concrete driveway? There are a …
Concrete Driveways | The Pros and Cons There are pros and cons to any building material. Yes, we are a concrete company. …
Can a Concrete Driveway be Resurfaced? Is your concrete cracking or lifting in some areas? Maybe you can see its color has …
How Long Should I Wait Before Driving on New Concrete? The main goal of laying down a new concrete driveway is so …
How to Repair Your Concrete Patio Natural occurrences, such as freeze-thaw cycles and ground movement can affect a patio surface’s durability. What …
Things to Avoid When Installing a Concrete Driveway Concrete driveway installation is considerably more complicated than it appears. Before concrete gets poured, …
How to Remove a Concrete Driveway How to Remove a Concrete Driveway for Replacement There are two methods for removing a driveway. …
Pouring Concrete Driveways in Winter There are a few reasons why it’s generally better to pour concrete in the winter months in …
Professional Concrete Installation vs. DIY While some homeowners opt to tackle concrete projects themselves, others choose to hire a professional contractor. There …
Why is My Concrete Driveway Lifting As your trusted local concrete contractor, we have extensive experience working on driveways. As such, we …
Renovate Your Driveway Before Selling Your Home When preparing to sell a house, it is important to take care of any necessary …
Does My Concrete Patio Need to be Replaced? Over time, even the best-made concrete patios can succumb to the elements and start …
Plano, TX & Greater DFW
469-552-7335
Please fill out our quote form above